
簡易GUIパネルで家電制御
概要
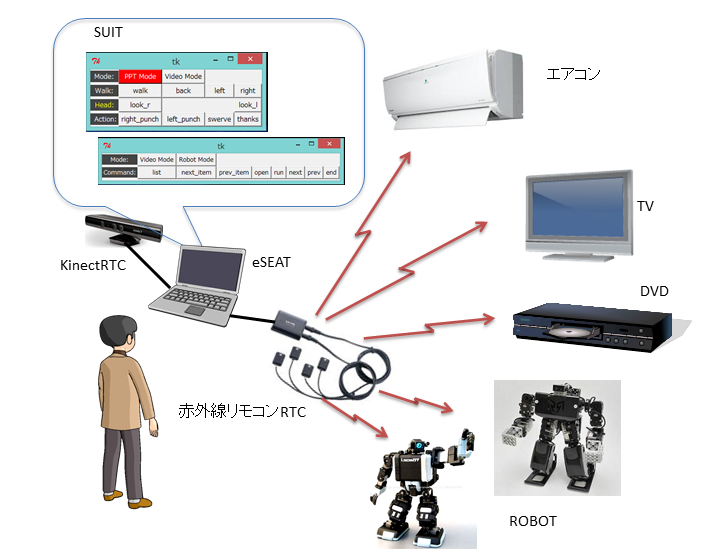
このシステム例は、SUITを使った(またはeSEATと同時に使った)簡単例ですが、学習リモコンRTCと組み合わせることで、赤外線リモコンで動作している色々な家電、ロボット等を操作することができます。学習リモコンRTCに関しては、バッファロ社から販売されていたRemoteStationを使っています。
あいにく現在ではすでに生産終了になっていますので、代替の製品(キット)として、http://bit-trade-one.co.jp/BTOpicture/Products/005-RS/を検討しています。
この製品用のRTCが完成次第公開する予定です。
この製品用のRTCが完成次第公開する予定です。
動作環境および必要なハードウェア
このシステム例で使用するハードウェア等は、下記の通りです。
- OpenRTM-aist-1.1以降の動作するPC(Linux化したAndroidスティック端末MK808でも動作確認済み)
- 赤外線学習ユニット(Buffalo社RemoteStation PC-OP-RS1)
- 赤外線で操作される家電(エアコン、テレビ、DVD等)またはロボット(ISOBOT, RQ HUNO等)
- 音声認識やジェスチャ認識をユーザインタフェースとして利用する場合は、KINECT for Windowsが利用可
このシステムで利用するコンポーネント等については、Windows用のバイナリのみ添付しています。また、ここで利用しているコンポーネントは、C++とPythonで実装されていますので、両方のRTCが動作する環境が必要です。
ソースコードからコンパイル等を行う場合には、OpenRTM-aist-1.1.0-Release(C++版)とOpenRTM-aist-1.1.0-RC1(Python版)をあらかじめインストールをお願いいたします。また、赤外線リモコンRTCは、PythonからRS232Cを利用しますので、pySerialという拡張パッケージが必要です。
コンポーネント構成
このシステムでのコンポーネント構成を下に示します。
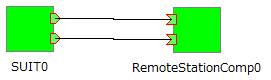
このシステム例は、一番単純な例で、SUITと赤外線リモコンRTCのみの構成になっています。SUITのスクリプトファイルは、下のように2つの状態(赤外線コードの記憶と送信)を持っています。
<?xml version="1.0" encoding="UTF-8"?>
<suitml>
 <general name="guicommand">
   <agent name="command" type="rtcout" datatype="TimedString" />
   <agent name="send" type="rtcout" datatype="TimedLong" />
 </general>

 <state name="ir_send_mode">
   <label text="RS:" color="#ffffff"/>
   <button label="Channel" >
     <command host="command">NextChannel</command>
   </button>
   <button label="LED" >
     <command host="command">LED</command>
   </button>
   <brk />

   <label text="再生モード"/>
   <button label="学習モードへ"  bg_color="#aaaaff">
     <command host="command">LearnMode</command>
     <statetransition>ir_learn_mode</statetransition>
   </button>
   <button label="LoadFile" >
     <command host="command">Load ir.dat</command>
   </button>
   <brk />

   <button label="電源" bg_color="#ffaaaa">
     <command host="send">1</command>
   </button>
   <space length="1" />
   <button label="入力切替" bg_color="#000000" color="#ffffff">
     <command host="send">2</command>
   </button>
   <brk />

   <button label="1" >
     <command host="send">5</command>
   </button>
   <button label="2" >
     <command host="send">6</command>
   </button>
   <button label="3" >
     <command host="send">7</command>
   </button>
   <brk />

   <button label="4" >
     <command host="send">8</command>
   </button>
   <button label="5" >
     <command host="send">9</command>
   </button>
   <button label="6" >
     <command host="send">10</command>
   </button>
   <brk />

   <button label="7" >
     <command host="send">11</command>
   </button>
   <button label="8" >
     <command host="send">12</command>
   </button>
   <button label="9" >
     <command host="send">13</command>
   </button>
   <brk />

   <button label="10" >
     <command host="send">14</command>
   </button>
   <button label="11" >
     <command host="send">15</command>
   </button>
   <button label="12" >
     <command host="send">16</command>
   </button>
   <brk />

   <button label="音量+" >
     <command host="send">17</command>
   </button>
   <space length="1" />
   <button label="チャンネル+" >
     <command host="send">19</command>
   </button>
   <brk />

   <button label="音量-" >
     <command host="send">18</command>
   </button>
   <space length="1" />
   <button label="チャンネル-" >
     <command host="send">20</command>
   </button>
 </state>

 <state name="ir_learn_mode">
   <label text="RS:" color="#ffffff"/>
   <button label="Channel" >
     <command host="command">NextChannel</command>
   </button>
   <button label="LED" >
     <command host="command">LED</command>
   </button>
   <brk />

   <label text="学習モード"/>
   <button label="再生モードへ"  bg_color="#aaaaff">
     <command host="command">SendMode</command>
     <statetransition>ir_send_mode</statetransition>
   </button>
   <button label="SaveFile" >
     <command host="command">Save ir.dat</command>
   </button>
   <brk />

   <button label="電源" bg_color="#ffaaaa">
     <command host="send">1</command>
   </button>
   <space length="1" />
   <button label="入力切替" bg_color="#000000" color="#ffffff">
     <command host="send">2</command>
   </button>
   <brk />

   <button label="1" >
     <command host="send">5</command>
   </button>
   <button label="2" >
     <command host="send">6</command>
   </button>
   <button label="3" >
     <command host="send">7</command>
   </button>
   <brk />

   <button label="4" >
     <command host="send">8</command>
   </button>
   <button label="5" >
     <command host="send">9</command>
   </button>
   <button label="6" >
     <command host="send">10</command>
   </button>
   <brk />

   <button label="7" >
     <command host="send">11</command>
   </button>
   <button label="8" >
     <command host="send">12</command>
   </button>
   <button label="9" >
     <command host="send">13</command>
   </button>
   <brk />

   <button label="10" >
     <command host="send">14</command>
   </button>
   <button label="11" >
     <command host="send">15</command>
   </button>
   <button label="12" >
     <command host="send">16</command>
   </button>
   <brk />

   <button label="音量+" >
     <command host="send">17</command>
   </button>
   <space length="1" />
   <button label="チャンネル+" >
     <command host="send">19</command>
   </button>
   <brk />

   <button label="音量-" >
     <command host="send">18</command>
   </button>
   <space length="1" />
   <button label="チャンネル-" >
     <command host="send">20</command>
   </button>

 </state>
</suitml>
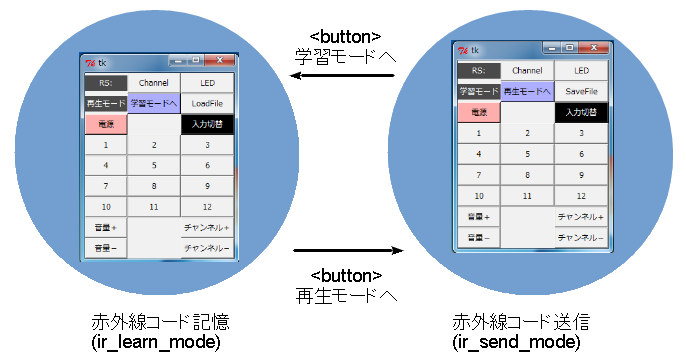
このSUITのスクリプトで生成されるGUIパネル(状態)は下図のようになります。
起動手順
このシステム例をこのページに添付しています。このシステムを使う前にRemoteStationのドライバのインストールをお願いいたします。バッファロ社のオフィシャルサイトには、Windows Vistaまでのドライバしかありません。
RemoteStationは、OSからはシリアルアダプタとして認識されており、FTDIチップのドライバで動作します。そこで、FTDIチップのドライバに含まれる INFファイルを修正してWindows7にインストールしてください。ただし、INFを自己責任で修正いたしますので、インストール時に警告のダイアログが表示されます。
Windows8以降では、ドライバの認証に関する機能が強化されており、INFファイルを変更してしまうとそのままでは署名ないのでインストールすることができません。そこで、Windows8以降の場合には、テストモードに変更して、「ドライバー署名の強制」を無効化してインストールしてください。
ドライバのインストールが終了すれば、あとは、本ページに添付されたアーカイブ(PortableRTM.zip)を適当なフォルダに展開して下さい。このアーカイブには、Python2.6,OpenJDK,OpenRTM-aistのランタイムがすべてはいっており、かつ、USBメモリなどにコピーすれば、どのWindowPCでも動作させることができると思います。
- まず、展開後のフォルダの下のPortableRTMに移動し、rtm-naming.batでネームサーバーの起動、RTSE _OpenJDK.batでRTシステムエディタRCP版を起動してください。
- 次に、IrCtrlDemo\00 Demo のフォルダを開きます。このフォルダの下には、下記の6つのバッチファイルがあります。
- 00 StartDemo.bat
- 01 ConnectAll.bat
- 02 ActivateAll.bat
- 11 DeactivateAll.bat
- 12 DisconnectAll.bat
- 13 EndDemo.bat
- 上記のバッチファイルのうち先頭が0のバッチファイルは、起動用のバッチファイルです。番号順に実行するとコンポーネントの起動、コンポーネント間の接続、アクティベーションを行うことができますので順番に起動してください。
操作の詳細
このシステム例では、基本的に2つの操作しかありません。1つが赤外線リモコンのコードを学習するモードでもう1つが記憶した赤外線リモコンコードを送信するモードです。
赤外線リモコンRTCは、リモコンコード送信モードで起動しますので、LoadFileボタンであらかじめ記憶された赤外線リモコンコードを読み込むか「学習モードへ」を押下し、リモコンコード学習モードに移行してください。
リモコンコード学習モードでは、チャンネルボタンを押下すれば、赤外線リモコンの記憶待ち状態になりますので、RemoteStationへリモコンから赤外線リモコンコードを送信してください。
記憶が正常に終了すれば、赤外線リモコンRTCの標準出力に終了したとのメッセージが表示されます。何らかのエラーが発生したときには、リモコンコードは記憶されません。
必要なリモコンコードの学習終了後は、SaveFileボタンでファイルに保存することができます。保存するファイル名は、赤外線リモコンRTCのコンフィグレーションパラメータで変更することができます。
添付ファイル:PortableRTM.zip