ソフトウェア関連 >> OpenRTM-aist のRTC開発システム(Yarbs) >> RTCの実装 >> PythonによるRTCの実装 >> データ入出力ポートの使用例:SimpleIO(Python)
データ入出力ポートの使用例:SimpleIO
ここでは、Yarbsを用いてOpenRTM-aistのサンプルコンポーネントであるSimpleIOの実装(ConsoleInとConsoleOut)を行います。
RTCの仕様作成
SimpleIOのRTCは、ConsoleInでは標準入力から整数を入力し、TimedLong型の出力データポートからデータを送信し、ConsoleOutでは、TimedLongの入力ポートからのデータを標準出力に表示します。
ConsoleIn(ConsoleIn.yaml)は、
name: ConsoleIn
version: 2.0.0
vendor: AIST
max_instance: 1
executionType: PeriodicExecutionContext
executionRate: 1.0
description: Console Input Component
category: example
component_type: STATIC
activity_type: PERIODIC
kind: DataFlowComponent
maintainer: Isao Hara
author: Isao Hara(isao-hara@aist.go.jp)
actions:
  - OnInitialize: true
  - OnExecute: true
dataport:
  - name: out
    flow: out
    type: RTC::TimedLong
    description: Outport
となり、ConsoleOut(ConsoleOut.yaml)は,
name: ConsoleOut
version: 2.0.0
vendor: AIST
max_instance: 1
executionType: PeriodicExecutionContext
executionRate: 1.0
description: Console Output Component
category: example
component_type: STATIC
activity_type: PERIODIC
kind: DataFlowComponent
maintainer: Isao Hara
author: Isao Hara(isao-hara@aist.go.jp)
actions:
  - OnInitialize: true
  - OnExecute: true
dataport:
  - name: in
    flow: in
    type: RTC::TimedLong
    description: DataIn
    datalistener: DataIn
となります。
RTCのひな形を生成
RTCの仕様を作成後、genRtcPythonコマンドでひな形を生成します。
 > "C:\Program Files\OpenRTM-aist\setup.bat"
 > genRtcPython ConsoleIn.yaml
 > genRtcPython ConsoleOut.yaml
genRtcPythonコマンドを実行後、ConsoleIn, ConsoleOutの構成ファイルは下のようになっています。
  ConsoleIn
     +-idl
     +-scripts
        +-ConsoleIn.py
        +-DataFlowRTC_Base.py
     +-ConsoleIn.exe
     +-idlcompile.bat
     +-rtc.conf

  ConsoleOut
     +-idl
     +-scripts
        +-ConsoleOut.py
        +-DataFlowRTC_Base.py
     +-ConsoleOut.exe
     +-idlcompile.bat
     +-rtc.conf
ここで実装コードは、ConsoleIn.py, ConsoleOut.pyに実装します。
ConsoleIn.exe, ConsoleOut.exeは、それぞれPythonのLaucherとなっており、環境変数PYTHON_EXEにpython.exeのパスを設定すれば、実行ファイルのように動作します。
また、idlcompile.batは、IDLコンパイラの呼出し用バッチファイルであり、この例では使用しません。
ConsoleIn.exe, ConsoleOut.exeは、それぞれPythonのLaucherとなっており、環境変数PYTHON_EXEにpython.exeのパスを設定すれば、実行ファイルのように動作します。
また、idlcompile.batは、IDLコンパイラの呼出し用バッチファイルであり、この例では使用しません。
RTCの実装
genRtcpythonコマンド実行後後、ConsoleIn.py, ConsoleOut.pyは以下のようになっています。
''ConsoleIn:''
#!/usr/bin/env python
# -*- coding: utf-8 -*-
# -*- Python -*-

"""
 @license the MIT License

 Copyright(C) 2018 Isao Hara,AIST,JP
 All rights reserved.

"""
from DataFlowRTC_Base import *

#---< local_def
#--->

##
# @class ProjectName
#
#
class ConsoleIn(DataFlowRTC_Base):
  ##
  # @brief constructor
  # @param manager Maneger Object
  #
  def __init__(self, manager):
    DataFlowRTC_Base.__init__(self, manager)
#---< init
#--->

  ##
  #
  # The initialize action (on CREATED->ALIVE transition)
  # formaer rtc_init_entry()
  #
  # @return RTC::ReturnCode_t
  #
  #
  def onInitialize(self):
    DataFlowRTC_Base.onInitialize(self)
#---< OnInitialize
#--->
    return RTC.RTC_OK


  #####
  #   onExecute
  #
  def onExecute(self, ec_id):
#---< OnExecute
#--->
    return RTC.RTC_OK


#---< local_def2
#--->
#########################################
g_rtc_data={'ProjectName': 'ConsoleIn',
 'actions': [{'OnInitialize': True}, {'OnExecute': True}],
 'activity_type': 'PERIODIC',
 'author': 'Isao Hara(isao-hara@aist.go.jp)',
 'category': 'example',
 'component_type': 'STATIC',
 'dataport': [{'description': 'Outport',
               'flow': 'out',
               'name': 'out',
               'type': 'RTC::TimedLong'}],
 'description': 'Console Input Component',
 'executionRate': 1.0,
 'executionType': 'PeriodicExecutionContext',
 'kind': 'DataFlowComponent',
 'maintainer': 'Isao Hara',
 'max_instance': 1,
 'name': 'ConsoleIn',
 'vendor': 'AIST',
 'version': '2.0.0'}

#########################################
#  Initializers
#
def main():
  global g_rtc_data
  mgr = rtc_init(ConsoleIn,
          #rtc_yaml=os.path.join(os.path.dirname(__file__), 'ConsoleIn.yaml'),
          rtc_data=g_rtc_data)
  mgr.runManager()

if __name__ == "__main__":
  main()
''ConsoleOut:''
#!/usr/bin/env python
# -*- coding: utf-8 -*-
# -*- Python -*-

"""
 @license the MIT License

 Copyright(C) 2018 Isao Hara,AIST,JP
 All rights reserved.

"""
from DataFlowRTC_Base import *

#---< local_def
#--->

##
# @class ProjectName
#
#
class ConsoleOut(DataFlowRTC_Base):
  ##
  # @brief constructor
  # @param manager Maneger Object
  #
  def __init__(self, manager):
    DataFlowRTC_Base.__init__(self, manager)
#---< init
#--->

  ##
  #
  # The initialize action (on CREATED->ALIVE transition)
  # formaer rtc_init_entry()
  #
  # @return RTC::ReturnCode_t
  #
  #
  def onInitialize(self):
    DataFlowRTC_Base.onInitialize(self)
#---< OnInitialize
#--->
    return RTC.RTC_OK


  #####
  #   onExecute
  #
  def onExecute(self, ec_id):
#---< OnExecute
#--->
    return RTC.RTC_OK

  #####
  #   onData
  #
  def onData(self, name, data):
    print(name, data)
#---< OnData
#--->

    return RTC.RTC_OK


#---< local_def2
#--->
#########################################
g_rtc_data={'ProjectName': 'ConsoleOut',
 'actions': [{'OnInitialize': True}, {'OnExecute': True}],
 'activity_type': 'PERIODIC',
 'author': 'Isao Hara(isao-hara@aist.go.jp)',
 'category': 'example',
 'component_type': 'STATIC',
 'dataport': [{'datalistener': 'DataIn',
               'description': 'DataIn',
               'flow': 'in',
               'name': 'in',
               'type': 'RTC::TimedLong'}],
 'description': 'Console Output Component',
 'executionRate': 1.0,
 'executionType': 'PeriodicExecutionContext',
 'kind': 'DataFlowComponent',
 'maintainer': 'Isao Hara',
 'max_instance': 1,
 'name': 'ConsoleOut',
 'vendor': 'AIST',
 'version': '2.0.0'}

#########################################
#  Initializers
#
def main():
  global g_rtc_data
  mgr = rtc_init(ConsoleOut,
          #rtc_yaml=os.path.join(os.path.dirname(__file__), 'ConsoleOut.yaml'),
          rtc_data=g_rtc_data)
  mgr.runManager()
if __name__ == "__main__":
  main()
上記のコードでわかると思いますが、ConsoleIn.py, ConsoleOut.pyの両方ともにonInitializedのメソッドでデータポートに関するコードがありません。これは、ConsoleIn(まはたConsolwOut)の親クラスであるDataFlowRTC_Baseでデータポート(およびサービスポート)の設定を行っているからです。
Yarbsでは、Pythonの実装コードは、C++の場合と比較して、非常に簡素化されていることがわかると思います。
では、ConsoleIn, ConsoleOutにコアロジックを実装していきます。
ConsoleIn
ConsoleInの機能は、アクティベートした状態で、標準入力から整数を入力し、TimedLongのデータポートからそのデータを出力するものです。
したがって、その機能をonExecuteの部分に実装コードを追加します。DataFlowRTC_Baseでは、タイムアウト付きの標準入力関数 input_with_timeoutが定義されていますので、ここでは、その関数を使用します。
したがって、その機能をonExecuteの部分に実装コードを追加します。DataFlowRTC_Baseでは、タイムアウト付きの標準入力関数 input_with_timeoutが定義されていますので、ここでは、その関数を使用します。
また、データ出力ポートのnameが ''out'' の場合はデータポートは、 self._outOut となり、データポートのデータ変数は、self._d_outとなります。
#---< OnExecute
    try:
      data = input_with_timeout("Please input: ", 10)
      self._d_out.data = int(data)
      OpenRTM_aist.setTimestamp(self._d_out)
      print("Sending to subscriber: ", self._d_out.data)
      self._outOut.write()
    except TimeoutExpired:
      pass
    except InputTerminated:
      self.deactivate(ec_id)
      print("...Deactivate")
    except:
      traceback.print_exc()
#--->
この実装例では、10秒ごとにタイムアウトが発生して、"Please input:"とう文字列が表示されます。以上で、ConsoleInの実装は終了です。
ConsoleOut
ConsoleOutの機能は、アクティベートの状態で、入力ポートからデータを受信したときに、そのデータを表示するものです。
したがって、ConsoleOutのonExecutionは、下のように実装することができます。
したがって、ConsoleOutのonExecutionは、下のように実装することができます。
データ入力ポートのnameが ''in'' の場合はデータポートは、 self._inIn となります。
#---< OnExecute
    try:
      if self._inIn.isNew():
        data = self._inIn.read()
        print("Received: ", data)
        print("Received: ", data.data)
        print("TimeStamp: ", data.tm.sec, "[s] ", data.tm.nsec, "[ns]")
    except:
      traceback.print_exc()
#--->
以上でConsoleOutの実装は終了です。
RTCの動作確認
RTCの実装終了後は、動作確認を行います。PythonによるRTCの実装の場合には、コンパイルなどの作業はありません。
したがって、適切な環境設定後、即座に実行することができます。
したがって、適切な環境設定後、即座に実行することができます。
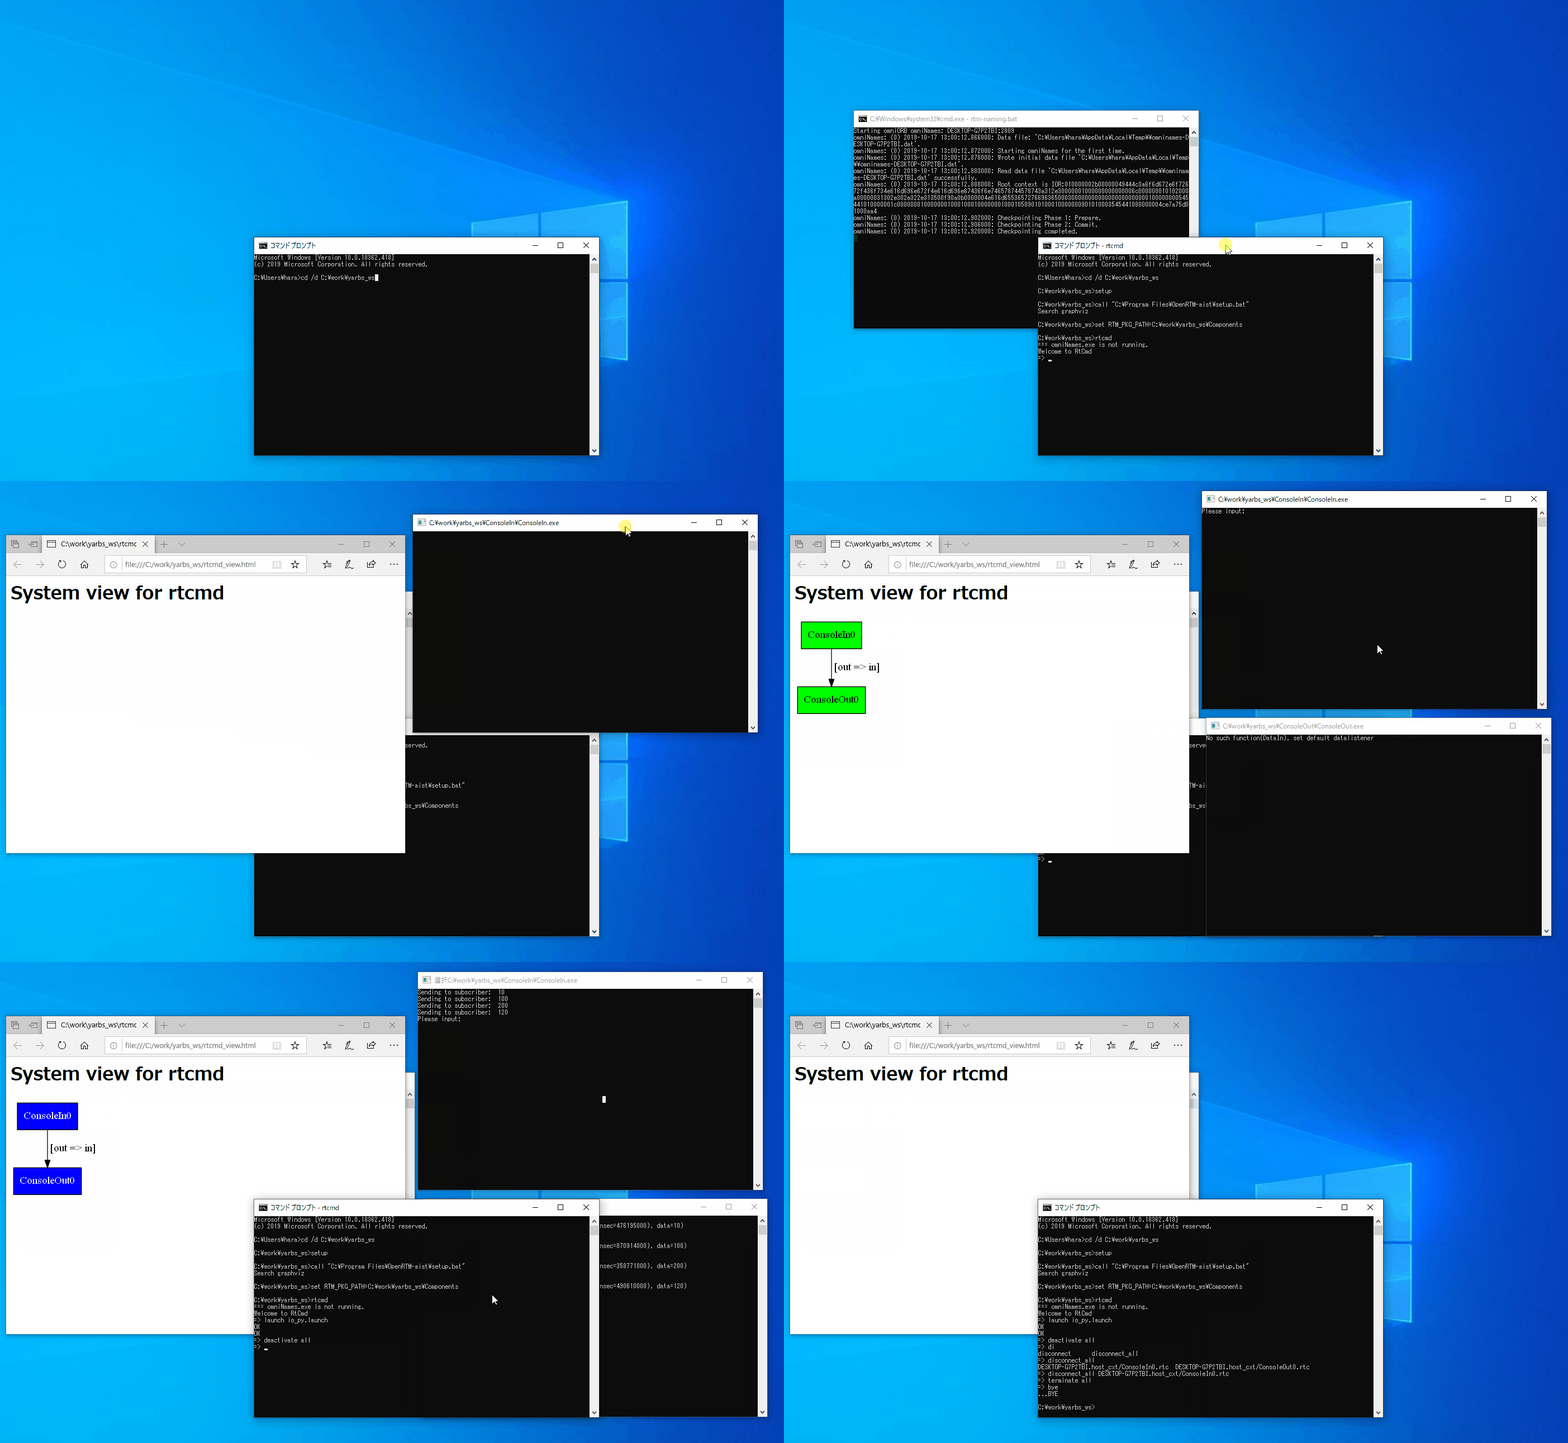
ここでもrtcmdを使って動作確認を行います。まずは、下のようにrtcmdを起動します。
 > "C:\Program Files\OpenRTM-aist\setup,bat"
 > rtcmd
 => start_graph
次にConsoleInとConsoleOutのRTCを起動します。RTCの起動は、startコマンドを使います。そして、データポートの接続を行ってください。
 => start ConsoleIn\ConsoleIn.exe
 => start ConsoleOut\ConsoleOut.exe
 => connect %h.host_cxt/ConsoleIn0.rtc:out %h.host_cxt/ConsoleOut0.rtc:in
 => activate all
RTCのアクティベートを行うとConsoleInの方に入力プロンプトが表示されますので、適当な数値を入力します。ENTERを押下後、ConsoleOutに入力した数値が表示されることを確認してください。
以上で、動作確認は終了です。下記のコマンドでRTCとrtcmdを終了させます。
 => deactivate all
 => terminate all
 => bye
上記の一連の動作を下の動画にしていますので参照してください。

この動画は、下記のlauncherファイルを使って起動しています。
start_graph
start ConsoleIn/ConsoleIn
wait_for 10 -c %h.host_cxt/ConsoleIn0
start ConsoleOut/ConsoleOut
wait_for 10 -c %h.host_cxt/ConsoleOut0
wait_for 3
connect %h.host_cxt/ConsoleIn0.rtc:out %h.host_cxt/ConsoleOut0.rtc:in
wait_for 3
activate all


