簡易GUI作成RTC:SUIT
SUIT(Simple User Interface for Test)は、RTコンポーネントの入力テスト用の管理GUIコンポーネントです。このコンポーネントは、OpenHRIで提供している対話制御コンポーネントと同じように内部に状態を持っており、状態を遷移することで、違うパネルに変更することができます。GUIの設計は、SEATで利用しているSEATMLと類似したSUITMLという記述方法で行います。
開発言語
eSEATは、SEATと同様にPython2.6上で開発しています。現在は、OpenRTM-aist-1.1.0-RC3を用いています。
また、下記のパッケージを使用していますので、ソースコードを用いて実行させる場合には、各サイトからダウンロードし、インストール後、実行委してください。
''必要なパッケージ''
- OpenRTM-aist-1.1.0-RC3
- lxml:
- https://pypi.python.org/pypi/lxml/3.2.1 からインストーラをダウンロードします。
- インストーラを起動し、インストールを完了します。
- BeautifulSoup:
- http://www.crummy.com/software/BeautifulSoup/から Beautiful Soup 3.2.1のソースコードをダウンロードして展開します。
- コマンドプロンプトを起動しset_up.py buildとset_up.py installを行いインストールを完了します。
- mtTkinter:スレッドセーフのTkパッケージ
- オフィシャルサイトから入手してください。(ソースコードも入っています)
- pygtk-all-in-one
- http://ftp.gnome.org/pub/GNOME/binaries/win32/pygtk/
- デフォルトでgtksourceview2がインストールされないので、適切に設定を変更して進めます。
また、eSEATをWindowsの実行ファイルにするには、下記のパッケージもインストールする必要があります。
- setuptools
- https://pypi.python.org/pypi/setuptools/0.8#windows から ez_setup.py をダウンロードします。
- コマンドプロンプトで ez_setup.py と実行しインストールを完了します。
- py2exe
- http://sourceforge.net/projects/py2exe/files/py2exe/0.6.9/py2exe-0.6.9.win32-py2.6.exe/download からインストーラをダウンロードします。
- インストーラを起動し、インストールを完了します。
使用方法
SUITの起動は下記のように行います。
python.exe SUIT.py [suitmlファイル名]
ライセンス
SUITは、マルチスレッド対応のmtTkinterを使用していますので、BSDライセンスでの配布にしております。
実行例
このページに添付しているファイルには、SUITのWindows用バイナリ化したものと下のようなサンプルファイルが同梱されています。
<?xml version="1.0" encoding="UTF-8"?>
<suiml>
 <general name="guicommand">
   <agent name="command" type="rtcout" datatype="TimedString" />
   <agent name="intdate" type="rtcout" datatype="TimedLong" />
 </general>

 <state name="isobot_mode">
   <label text="Mode:" />

   <button label="PPT Mode" bg_color="#ff0000" color="#ffffff">
     <command host="command">ppt</command>
     <statetransition>ppt_mode</statetransition>
   </button>

   <button label="Video Mode" >
     <command host="command">video</command>
     <statetransition>video_mode</statetransition>
   </button>

   <brk />
   <label text="Walk:" />

   <button label="walk" >
     <command host="command" encode="shift-jis">walk</command>
   </button>
   <button label="back" >
     <command host="command" encode="shift-jis">back</command>
   </button>
   <button label="left" >
     <command host="command">left</command>
     <command host="intdate">124</command>
   </button>
   <button label="right">
     <command host="command">right</command>
   </button>

   <brk />
   <label text="Head:" color="#ffff00"/>
   <button label="look_r" >
     <command host="command">look_r</command>
   </button>
  <space length="2" />
   <button label="look_l" >
     <command host="command">look_l</command>
   </button>

   <brk />
   <label text=" Action:" />
   <button label="right_punch" >
     <command host="command">right_punch</command>
   </button>
   <button label="left_punch" >
     <command host="command">left_punch</command>
   </button>
   <button label="swerve" >
     <command host="command">swerve</command>
   </button>
   <button label="thanks">
     <command host="command">thanks</command>
   </button>
 </state>

 <state name="ppt_mode">
   <label text="Mode:" />
   <button label="Video Mode" >
     <command host="command">video</command>
     <statetransition>video_mode</statetransition>
   </button>
   <button label="Robot Mode" >
     <statetransition>isobot_mode</statetransition>
   </button>

   <brk />
   <label text="Command:" />
   <button label="list" >
     <command host="command">list</command>
   </button>
   <button label="next_item" >
     <command host="command">next_item</command>
   </button>
   <button label="prev_item" >
     <command host="command">prev_item</command>
   </button>
   <button label="open" >
     <command host="command">open</command>
   </button>
   <button label="run" >
     <command host="command">run</command>
   </button>
   <button label="next" >
     <command host="command">next</command>
   </button>
   <button label="prev">
     <command host="command">prev</command>
   </button>
   <button label="end">
     <command host="command">end</command>
   </button>
 </state>

 <state name="video_mode">
   <label text="Mode:" />
   <button label="PPT Mode" >
     <command host="command">ppt</command>
     <statetransition>ppt_mode</statetransition>
   </button>
   <button label="Robot Mode" >
    <statetransition>isobot_mode</statetransition>
   </button>

   <brk />
   <label text="Command:" />
   <button label="list">
     <command host="command">list</command>
   </button>
   <button label="next_item" >
     <command host="command">next_item</command>
   </button>
   <button label="prev_item" >
     <command host="command">prev_item</command>
   </button>
   <button label="Open">
     <command host="command">open</command>
   </button>
   <button label="Play" >
     <command host="command">play</command>
   </button>
   <button label="FF">
     <command host="command">ff</command>
   </button>
   <button label="REW">
     <command host="command">bw</command>
   </button>
   <button label="Stop">
     <command host="command">stop</command>
   </button>
   <button label="Pause">
     <command host="command">pause</command>
   </button>
   <button label="full Screen">
     <command host="command">fullScreen</command>
   </button>
 </state>
</suiml>
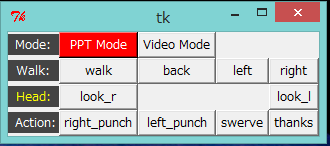
このファイルを実行すると下図のようなパネルが現れます。

また、PPT Mode, Video Modeのボタンを押下すると下図のようなパネルに変化します。


SUITML
SUITMLは、SUITで使用しているスクリプトファイル記述です。suitml.xsd というファイルにXMLスキーマが定義されています。
SUITMLで記述ファイルは、下記の構造を持っています。
- ''XML宣言文'': <?xml version="1.0" uncoding="UFT-8" ?>
- ''suitmlタグ'':SUITの振舞の定義
- ''generalタグ'':ポートの定義(0コまたは1コ)
- ''agentタグ'': データポート、TCPソケットポートの定義(0コ以上)
- ''stateタグ'':状態の定義(0コ以上)
- ''<onentry>タグ'':この状態に遷移した時のルール(0コまたは1コ)
- ''<command>タグ'': 出力する文字列(0コ以上)
- ''<onexit>タグ'':この状態を抜けるときのルール(0コまたは1コ)
- ''<command>タグ'': 出力する文字列(0コ以上)
- ''<label>タグ'':1つのラベルを作成(0コ以上)
- ''<brk>タグ'': GUIパネル内の改行(0コ以上)
- ''<space>タグ'':GUIパネルにスペース挿入(0コ以上)
- ''<button>タグ'':1つのGUIボタンを作成(0コ以上)
- ''<command>タグ'': 出力する文字列(0コ以上)
- ''<script>タグ'': 実行するPythonスクリプト(0コ以上)
- ''<shell>タグ'': 実行するシェルコマンド(0コ以上)
- ''<statetransition>タグ'': 状態を遷移させる(0コまたは1コ)
- ''<onentry>タグ'':この状態に遷移した時のルール(0コまたは1コ)
- ''generalタグ'':ポートの定義(0コまたは1コ)
suitmlタグ内は、<general>タグによるポートの定義と<state>タグによる状態の定義に分かれており、ポートと状態の定義を記載します。
ポートの定義(generalタグ)
ポートの定義は、generalタグ(name属性は必須)内で、<agent>タグで設定を行います。agent>タグには、nameとtypeという属性を必ず記述する必要があります。ポートの定義には、datatype, host, portの属性を持つことができますが、typeには、rtcin,rtcout, socketの3つを書くことができます。typeがrtcin,rtcoutのときには、OpenRTM-aistのデータポートが生成され、データ型をdatatype属性で設定します。また、typeがsocketの場合には、TCPソケットポートを生成しますので、hostとportの属性で、接続先のホスト名とポート番号を設定します。
下記の例では、gestureとlongalueという名前の入力データポート(データ型は、それぞれTimedStrng,TimedLong)とcommandという名前の出力データポート(データ型は、TimedString)、ppt,mplayerという名前のTCPソケットポートを生成しています。
  <general name="flaggame">
    <agent name="gesture" type="rtcin" datatype="TimedString" />
    <agent name="longvalue" type="rtcin" datatype="TimedLong" />
    <agent name="command" type="rtcout" datatype="TimedString" />
    <agent name="ppt" type="socket" host="localhost" port="10030" />
    <agent name="mplayer" type="socket" host="localhost" port="10020" />
  </general>
状態定義(stateタグ)
SUITMLでは、複数の状態をstateタグで定義することができます。stateタグには、name属性を記述する必要があります。また、stateタグで定義された状態には、onentryタグ、onexitタグ、buttonタグを用いて振舞を定義することができます。
状態遷移時の振舞1(onentryタグ)
定義した状態に遷移したときの1度だけ実行するルールをonentryタグを用いて記述することができます。onentryタグには、commandタグにより出力する文字列を定義することができます。このタグは、onexitタグよりも前に記述する必要があります。
commandタグは、host属性が必須であり、その値はagentタグで定義したnameの属性と一致する必要があります。例えば、
<cammand name="command">TEST</command>
と記述すると"command"という名前を持ったagentに"TEST"という文字列を出力することになります。
まだ、scriptタグ、shellタグの定義はできませんが、後日対応予定です。
状態遷移時の振舞2(onexitタグ)
定義した状態にから別の遷移するときの1度だけ実行するルールをonexitタグを用いて記述することができます。このタグは、ruleタグよりも前に記述する必要があります。
onentryタグには、commandタグにより出力する文字列を定義することができます。commandタグについては、onentryタグの記述と同じです。
こちらもまた、scriptタグ、shellタグの定義はできませんが、後日対応予定です。
状態内でのGUI定義(buttonタグ)
定義した状態内での主なGUIの定義は、buttonタグを用いて記述します。ボタンは、デフォルトでは、左詰めで一列に配列されます。複数の行のパネルを作成する場合には、後述のbrkタグを挿入することで、開業をすることができます。buttonタグには、任意の数のcommandタグ、scriptタグ、shellタグ、statetransitionタグを定義することができます。
buttonタグでは、label, color, bg_colorの3つの属性を設定することができます。
- ''label:'' ボタンに表示する文字列(必須)
- ''color:''文字列の色(デフォルトは黒)
- ''bg_color:''ボタンの背景の色(デフォルトは、グレー)
''制限事項:''ここで注意していただきたいのは、labelがボタンのIDになっていますので、同じパネルに同じ名前のボタンを生成できません、これに関してはリクエストがあれば対応したいと思います。
commandタグ
commandタグは、buttonが押された時に出力する文字列を定義します。このタグは、onentryタグのときと同じ書式、動作を行います。
このタグは、buttonタグ内では、任意の数だけ記述することができます。
scriptタグ
scriptタグは、buttonが押された時に実行するPythonスクリプト定義します。このタグには、host属性を記述することができます。host属性が定義されるとそれに対応する出力ポートに対して、'''rtc_result'''というグローバル変数のデータを結果を出力します。
ここで注意しなければいけないのは、記述されたコードは、Pythonスクリプトとして評価(実行)されますので、インデントなしで記述してください。
例えば、下記の例では、グローバル変数current_itemが10の場合に、この値を1減じて9とし、pptという名前のポートにを''(select 9)''という文字列を出力します。
<script host="ppt">
global current_item
current_item -= 1
rtc_result="(select %d)" % current_item
</script>
このタグは、buttonタグ内では、任意の数だけ記述することができます。
shellタグ
shellタグは、buttonが押された時に実行するシェルコマンド定義します。このタグには、host属性を記述することができます。
SUIT内では、Pythonのsystem関数に引き渡して実行されます。
host属性が定義されるとそれに対応する出力ポートに対して、system関数の返り値を結果として出力します。
このタグは、buttonタグ内では、任意の数だけ記述することができます。
statetransitionタグ
statetransitionタグは、buttonが押された時に実行する状態遷移を定義します。
例えば、
<statetransition>ppt_mode</statetransition>
のように記述し、ppt_modeに内部状態を遷移させることができます。
このタグが定義されるとSUIT内の状態が遷移しますので、commandタグ、scriptタグ、shellタグよりも後(一番最後)に記述するようにしてください。
このタグは、buttonタグ内では、1つだけ記述することができます。
状態内でのGUI定義(labelタグ)
labelタグでは、ラベルウィジェットを生成します。このタグが挿入されるとその場所にラベルがせいせいされるのみです。このタグにも、buttonタグと同じ属性を設定することができます。
- ''label:'' ボタンに表示する文字列(必須)
- ''color:''文字列の色(デフォルトは黒)
- ''bg_color:''ボタンの背景の色(デフォルトは、グレー)
状態内でのGUI定義(brkタグ)
SUITでは、定義されたボタンやラベルを左詰めで一列に配置します。そのままでは、画面からはみ出してしまいますので、ウィジェットを複数行に配置するためにbrkタグを使用します。brkタグは、labelタグ、buttonタグで生成されるウィジェットを開業するために挿入します。brkタグには、属性等はありません。
状態内でのGUI定義(spaceタグ)
SUITでは、ウィジェットは、左詰めに配置されますが、ウィジェット間にスペースを空けたい場合があります。その時に、このspaceタグを使います。spaceタグには、length属性を付加することができます。この属性値の幅だけ右にウィジェットの位置をずらすことができます。
今後の予定
現在のSUITは、ボタンとラベルのウィジェットを簡単に生成できるように実装しています。今後は、テキストボックスやジョイスティック、メニューなどのウィジェットが配置できるように拡張していく予定です。
添付ファイル:suit.zip

